Tuesday, November 19, 2013

USING FRAGMENTS AND ACTION BAR IN ANDROID

2. FRAGMENTS
2.1. What are fragments?
A fragment is an independent component which can be used by an activity. A fragment encapsulates functionality so that it is easier to reuse within activities and layouts.
A fragment runs in the context of an activity, but has its own life cycle and typically its own user interface. It is also possible to define fragments without an user interface, i.e., headless fragments.
Fragments can be dynamically or statically added to an activity.
2.2. Advantages of using fragments
Fragments make it easy to reuse components in different layouts, e.g., you can build single-pane layouts for handsets (phones) and multi-pane layouts for tablets. This is not limited to tablets; for example, you can use fragments also to support different layout for landscape and portrait orientation on a smartphone.
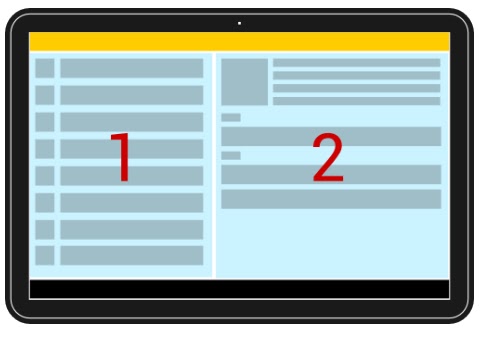
The typical example is a list of items in an activity. On a tablet you see the details immediately on the same screen on the right hand side if you click on item. On a smartphone you jump to a new detail screen. This is depicted in the following graphic.

The following discussion will assume that you have two fragments (main and detail), but you can also have more. We will also have one main activity and one detailed activity. On a tablet the main activity contains both Fragments in its layout, on a handheld it only contains the main fragment.
The following screenshots demonstrates this usage.

2.3. How to work with Fragments
To create different layouts with Fragments you can:
·    Use one activity, which displays two Fragments for tablets and only one on handsets devices. In this case you would switch the Fragments in the activity whenever necessary. This requires that the fragment is not declared in the layout file as such Fragments cannot be removed during runtime. It also requires an update of the action bar if the action bar status depends on the fragment.
·    Use separate activities to host each fragment on a handset. For example, when the tablet UI uses two Fragments in an activity, use the same activity for handsets, but supply an alternative layout that includes just one fragment. When you need to switch Fragments, start another activity that hosts the other fragment.
The second approach is the most flexible and in general preferable way of using Fragments. In this case the main activity checks if the detail fragment is available in the layout. If the detailed fragment is there, the main activity tells the fragment that it should update itself. If the detail fragment is not available, the main activity starts the detailed activity.
3. Defining and using Fragments
3.1. Defining fragments
To define a new fragment you extend either the android.app.Fragment class or one of its subclasses, for example ListFragment, DialogFragment, PreferenceFragment or WebViewFragment. The following code shows an example implementation.
package com.example.android.rssfeed;

import android.app.Fragment;
import android.os.Bundle;
import android.view.LayoutInflater;
import android.view.View;
import android.view.ViewGroup;
import android.widget.TextView;

public class DetailFragment extends Fragment {

  @Override
  public View onCreateView(LayoutInflater inflater, ViewGroup container,
      Bundle savedInstanceState) {
    View view = inflater.inflate(R.layout.fragment_rssitem_detail,
        container, false);
    return view;
  }

  public void setText(String item) {
    TextView view = (TextView) getView().findViewById(R.id.detailsText);
    view.setText(item);
  }
}
3.2. Adding fragments statically
To use your new fragment you can statically add it to an XML layout
To check if the fragment is already part of your layout you can use the FragmentManager class.
DetailFragment fragment = (DetailFragment) getFragmentManager().
   findFragmentById(R.id.detail_frag);
if (fragment==null || ! fragment.isInLayout()) {
  // start new Activity
  }
else {
  fragment.update(...);
}
If a fragment is defined in an XML layout file, the android:name attribute points to the corresponding class.
3.3. Fragment life cycle
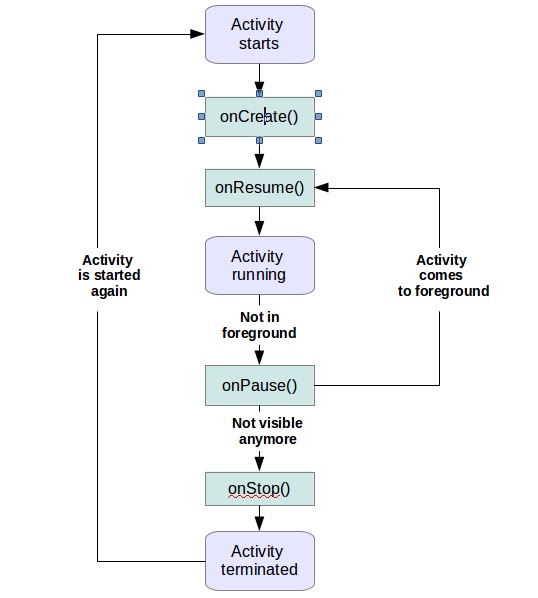
A fragment has its own life cycle. But it is always connected to the life cycle of the activity which uses the fragment.
The onCreate() method is called after the onCreate() method of the activity but before the onCreateView()method of the fragment.
The onCreateView() method is called by Android once the fragment should create its user interface. Here you can inflate a layout via the inflate() method call of the Inflator object passed as a parameter to this method. There is no need to implement this method for headless fragments.
The onActivityCreated() is called after the onCreateView() method when the host activity is created. Here you can instantiate objects which require a Context object.
Fragments don't subclass the Context you have to use the getActivity() method to get the parent activity.
The onStart() method is called once the fragment gets visible.
If an activity stops, its fragments are also stopped; if an activity is destroyed its fragments are also destroyed.
3.4. Application communication with Fragments
To increase reuse of Fragments they should not directly communicate with each other. Every communication of the Fragments should be done via the host activity.
For this purpose a Fragment should define an interface as an inner type and require that the activity which uses it, must implement this interface. This way you avoid that the Fragment has any knowledge about the activity which uses it. In its onAttach() method it can check if the activity correctly implements this interface.
For example, assume you have a Fragment which should communicate a value to its parent activity. This can be implemented like the following.
package com.example.android.rssfeed;

import android.app.Activity;
import android.app.Fragment;
import android.os.Bundle;
import android.view.LayoutInflater;
import android.view.View;
import android.view.ViewGroup;
import android.widget.Button;

public class MyListFragment extends Fragment {

  private OnItemSelectedListener listener;

  @Override
  public View onCreateView(LayoutInflater inflater, ViewGroup container,
      Bundle savedInstanceState) {
    View view = inflater.inflate(R.layout.fragment_rsslist_overview,
        container, false);
    Button button = (Button) view.findViewById(R.id.button1);
    button.setOnClickListener(new View.OnClickListener() {
      @Override
      public void onClick(View v) {
        updateDetail();
      }
    });
    return view;
  }

  public interface OnItemSelectedListener {
    public void onRssItemSelected(String link);
  }

  @Override
  public void onAttach(Activity activity) {
    super.onAttach(activity);
    if (activity instanceof OnItemSelectedListener) {
      listener = (OnItemSelectedListener) activity;
    } else {
      throw new ClassCastException(activity.toString()
          + " must implemenet MyListFragment.OnItemSelectedListener");
    }
  }

  @Override
  public void onDetach() {
    super.onDetach();
    listener = null;
  }

  // May also be triggered from the Activity
  public void updateDetail() {
    // create a string, just for testing
    String newTime = String.valueOf(System.currentTimeMillis());

    // Inform the Activity about the change based
    // interface defintion
    listener.onRssItemSelected(newTime);
  }
}
4. Persisting data in Fragments
4.1. Persisting data between application restarts
In fragments you also need to store your application data. For this you can persists the data in a central place. For example
·    SQlite database
·    File
·    The application object, if this case the application need to handle the storage
4.2. Persisting data between configurations changes
If you want to persists data between configuration changes you can also use the application object.
In addition to that you can use the setRetainState(true) method call on the fragments. This retains the instance of the fragments between configuration changes but only works if the fragments is not added to the backstack. Using this method is not recommend by Google for fragments which have an user interface. In this case the data must be stored as member (field).
If the data which should be stored is supported by the Bundle class, you can use the onSaveInstanceState()method to place the data in the Bundle, and retrieve that data the onActivityCreated() method.
5. Modifying Fragments at runtime
The Fragment Manager class and the Fragment Transaction class allow you to add, remove and replace fragments in the layout of your activity.
Fragments can be dynamically modified via transactions. To dynamically add Fragments to an existing layout you typically define a container in the XML layout file in which you add a Fragment. For this you can use for example a FrameLayout element.
FragmentTransaction ft = getFragmentManager().beginTransaction();
ft.replace(R.id.your_placehodler, new YourFragment());
ft.commit();
A new Fragment will replace an existing Fragment that was previously added to the container.
If you want to add the transaction to the backstack of Android you use the addToBackStack() method. This will add the action to the history stack of the activity, i.e. this will allow to revert the Fragment changes via the back button.
6. Animations for Fragment transition
During a Fragment transaction you can define animations which should be used based on the Property Animation API via the setCustomAnimations() method.
You can also use several standard animations provided by Android via the setTransition() method call. These are defined via the constants starting with FragmentTransaction.TRANSIT_FRAGMENT_*.
Both methods allow you to define an entry animation and an exist animation.
7. Adding Fragments transition to the backstack
You can add a FragmentTransition to the backstack to allow the user to use the back button to reverse the transition.
For this you can use the addToBackStack() method on the FragmentTransition object.
8. Fragments for background processing
8.1. Headless Fragments
Fragments can be used without defining a user interface.
To implement a headless fragment simply return null in the onCreateView() method of your fragment.
8.2. Retained headless fragments to handle configuration changes
Headless fragment are typically used to encapsulate some state across configuration changes or for a background processing task. For this purpose you would set your headless fragment to be retained. A retained fragment is not destroyed during configuration changes.

To set your fragment to retained, call its setRetainInstance() method.
To add such a Fragment to an activity you use the add() method of the FragmentManager class. If you need to refer to this Fragment later, you need to add it with a tag to be able to search for it via the findFragmentByTag()method of the FragmentManager.
9. Contributing to the ActionBar
Fragments can also contribute entries to the ActionBar. To do this, call setHasOptionsMenu() in theonCreate() method of the fragment. The Android framework calls in this case the onCreateOptionsMenu()method in the Fragment class and adds its menu items to the ones added by the activity.


ANDROID APPLICATION & ACTIVITY LIFECYCLE

1. Managing the application life cycle

Android devices have limited resources, therefore the Android system is allowed to manage the available resources by terminating running processes or recycling Android components.
In addition to resource management, Android also recreates activities in case a configuration change occurs. TheConfiguration object contains the current device configuration, if this configuration changes activities are restarted, as they may use different resources for this configuration.
For the user of the device this should happen transparently, i.e. he should not note if an Android component have been terminated nor not.
To support this the Android platform supports lifecycle event which are called in the case of process or component termination as well as in case of a configuration change. The developer is responsible for maintaining the state of the application. He is also responsible for restore the activity instance state. The instance state of an activity is the nonpersistent data that needs to be passed between activities restarts during a configuration change to restore user selections.

2. Application

The application object is created whenever one of your Android components are started. It is started in a new process with a unique ID under a unique user. Even if you do not specify one in your AndroidManifest.xml file, the Android system creates a default object for you. This object provides the following main lifecycle methods:
·    onCreate() - called before the first components of the application starts
·    onLowMemory() - called when the Android system requests that the application cleans up memory
·    onTerminate() - only for testing, not called in production
·    onConfigurationChanged() - called whenever the configuration changes
The application object starts before any component and runs at least as long as another component of the application runs.
If the Android system needs to terminate processes it follows the following priority system.
Table 1. Priorities
Process status
Description
Priority
Foreground
An application in which the user is interacting with an activity, or which has an service which is bound to such an activity. Also if a service is executing one of its lifecycle methods or a broadcast receiver which runs its onReceive() method.
1
Visible
User is not interacting with the activity, but the activity is still (partially) visible or the application has a service which is used by a inactive but visible activity.
2
Service
Application with a running service which does not qualify for 1 or 2.
3
Background
Application with only stopped activities and without a service or executing receiver. Android keeps them in a least recent used (LRU) list and if requires terminates the one which was least used.
4
Empty
Application without any active components.
5

3. Activity lifecycle

The Android system is also allowed to recycle Android components to free up resources. This part explains which for activities, the lifecycle of other components is described in the respective part of these components.
An activity can be in different states which are described by the following table.
Table 2. Activity state
State
Description
Running
Activity is visible and interacts with the user.
Paused
Activity is still visible but partially obscured, instance is running but might be killed by the system.
Stopped
Activity is not visible, instance is running but might be killed by the system.
Killed
Activity has been terminated by the system of by a call to its finish() method.
The user should not notice if an activity which is still part of an activity stack has been terminate or not. For this the developer needs to store the state of the activity at the right point in time and restore it. He also should stop any unnecessary actions if the activity is not visible anymore to save system resources.
The Android system defines a lifecycle for activities for activities via predefined (lifecycle) methods. The most important methods are:
Table 3. Important Activity lifecycle methods
Method
Purpose
onCreate()
Called then the activity is created. Used to initialize the activity, for example create the user interface.
onResume()
Called if the activity get visible again and the user starts interacting with the activity again. Used to initialize fields, register listeners, bind to services, etc.
onPause()
Called once another activity gets into the foreground. Always called before the activity is not visible anymore. Used to release resources or save application data. For example you unregister listeners, intent receivers, unbind from services or remove system service listeners.
onStop()
Called once the activity is no longer visible.
 Time or CPU intensive shut-down operations, such as writing information to a database should be down in the onStop() method. This method is guaranteed to be called as of API 11.

The life cycle of an activity with its most important methods is displayed in the following diagram.

Android has more life cycle methods but not all of these methods are guaranteed to be called. The onDestroy()method is not guaranteed to be called, hence you typically do not use it. 

4. Activity instance state

Instance state of an activity which is required to restore the activity to the state in which the user left it.
Assume for example the user scrolled through a ListView with thousands of items and the activity is recreated. Loosing the position in the list is annoying for the user, hence the position should be restored.
The onSaveInstanceState() can be used to store this instance state as a Bundle. A Bundle can contain primitive data types, arrays, String and objects which are of the Parcelable or Serialisable type.
The persisted Bundle data is passed at restart of the activity to the onCreate() method andonRestoreInstanceState() as parameter.
If you override onSaveInstanceState() and onRestoreInstanceState() you should call the super implementation of it, because the default views of Android store their data via a call toView.onSaveInstanceState from the onSaveInstanceState() method of the activity. For exampleEditText stores its content via the default call of this method.
The onRestoreInstanceState() or the onCreate() methods can be used to recreate the instance scope of an activity if it is restarted.
If the user interacts with an activity and presses the Back button or if the finish() method of an activity is called, the activity is removed from the current activity stack and recycled. In this case there is no instance state to save and the onSaveInstanceState() method is not called.
If the user interacts with an activity and presses the Home button, the activity instance state must be saved. TheonSaveInstanceState() method is called. If the user restarts the application it will resume or restart the last running activity. If it restarts the activity it provides the bundle with the save data to theonRestoreInstanceState() and onCreate() methods.

5. Nonconfiguration instance scope

Nonconfiguration instance scope are Java objects which need to passed from one instance to the next instance of an activity in case of an configuration change.
Saving and restoring one object was possible with the getLastNonConfigurationInstance() andonRetainNonConfigurationInstance() methods. These methods have been deprecated, you should prefer using headless retained fragments for holding to objects which should be passed between activity instances due to configuration changes.

6. Controlling configuration

6.1. Avoiding configuration change restarts

An activity is restarted if a configuration change occurs. A configuration change happens if an event is triggered from the actual the Android device which may be relevant for the application.
An instance of the Configuration class defines the current configuration of the device. Typical configuration is the device orientation, the locale the smallest width, etc.
For example if the user changes the orientation of the device (vertically or horizontally). Android assumes that an activity might want to use different resources for these orientations and restarts the activity.
In case an activity is restarted the programmer must ensure that the activity is recreated in the same state as before the restart. The Android provides several potential means for doing this.
In the emulator you can simulate the change of the orientation via the Ctrl+F11 shortcut.
You can avoid a restart of your application for certain configuration changes via the configChanges attribute on your activity definition in your AndroidManifest.xml. The following setting avoids an activity restart incase of orientation changes or position of the physical keyboard (hidden / visible).
<activity android:name=".ProgressTestActivity"
     android:label="@string/app_name"
     android:configChanges="orientation|keyboardHidden|keyboard">
</activity> 


6.2. Fixing the orientation for an activity

It is also possible to define that an activity should only be used in a specific screen orientation via theAndroidManifest.xml file. Such an example configuration is listed below.
<activity
   android:name="com.vogella.android.multitouch.MainActivity"
   android:label="@string/app_name"
   android:screenOrientation="landscape" >
   <intent-filter>
      <action android:name="android.intent.action.MAIN" />
    <category android:name="android.intent.category.LAUNCHER" />
   </intent-filter>
</activity> 

7. Exercise: Lifecycle

7.1. Prepare project

Create a new project called com.vogella.android.lifecycle.activity.
Create the following class which is used to report lifecycle events via notifications.

package com.vogella.android.lifecycle.activity;
 
import android.app.Activity;
import android.app.Notification;
import android.app.NotificationManager;
import android.os.Bundle;
 
public class TracerActivity extends Activity {
 
  @Override
  protected void onCreate(Bundle savedInstanceState) {
    super.onCreate(savedInstanceState);
    notify("onCreate");
  }
 
  @Override
  protected void onPause() {
    super.onPause();
    notify("onPause");
  }
 
  @Override
  protected void onResume() {
    super.onResume();
    notify("onResume");
  }
 
  @Override
  protected void onStop() {
    super.onStop();
    notify("onStop");
  }
 
  @Override
  protected void onDestroy() {
    super.onDestroy();
    notify("onDestroy");
  }
 
  @Override
  protected void onRestoreInstanceState(Bundle savedInstanceState) {
    super.onRestoreInstanceState(savedInstanceState);
    notify("onRestoreInstanceState");
  }
 
  @Override
  protected void onSaveInstanceState(Bundle outState) {
    super.onSaveInstanceState(outState);
    notify("onSaveInstanceState");
  }
 
  private void notify(String methodName) {
    String name = this.getClass().getName();
    String[] strings = name.split("\\.");
    Notification noti = new Notification.Builder(this)
        .setContentTitle(methodName + " " + strings[strings.length - 1]).setAutoCancel(true)
        .setSmallIcon(R.drawable.ic_launcher)
        .setContentText(name).build();
    NotificationManager notificationManager = (NotificationManager) getSystemService(NOTIFICATION_SERVICE);
    notificationManager.notify((int) System.currentTimeMillis(), noti);
  }
 
} 
Create two activity which extend this one. The first activity should allow to start the second one via an Intent.

7.2. Testing

Start your application and trigger the second activity. Review the notifications and ensure you know why this order of things are happening.

Press the Back button on the second activity. Validate that onSaveInstanceState() is not called. Explain why it is not called.
Press the home button on the second activity. Validate that onSaveInstanceState() is called. Explain why it is called.
Start the second activity. Switch the orientation of your emulator via the CTRL+F11 shortcut and see which lifecycle methods of the activity are called. Is the first activity also re-created or only the second one?
Activate the Don't keep activities setting in the Developer Options. Test again which methods are called.

7.3. Instance state

Create a string array and add a spinner to your first activity using this array. The following lists the strings.xml and the layout file used by the first activity.
<?xml version="1.0" encoding="utf-8"?>
<resources>
     <string name="app_name">Lifecycle</string>
    <string name="action_settings">Settings</string>
    <string name="hello_world">Hello world!</string>
    <string-array name="operating_systems">
        <item >Ubuntu</item>
        <item >Android</item>
        <item >iOS</item>
    </string-array>
 </resources> 
<LinearLayout xmlns:android="http://schemas.android.com/apk/res/android"
    xmlns:tools="http://schemas.android.com/tools"
    android:id="@+id/LinearLayout1"
    android:layout_width="match_parent"
    android:layout_height="match_parent"
    android:orientation="vertical"
    android:paddingBottom="@dimen/activity_vertical_margin"
    android:paddingLeft="@dimen/activity_horizontal_margin"
    android:paddingRight="@dimen/activity_horizontal_margin"
    android:paddingTop="@dimen/activity_vertical_margin"
    tools:context=".MainActivity" >
    <Spinner
        android:id="@+id/spinner1"
        android:layout_width="wrap_content"
        android:layout_height="wrap_content"
        android:layout_marginRight="58dp"
        android:entries="@array/operating_systems" />
   <Button
        android:id="@+id/button1"
        android:layout_width="wrap_content"
        android:layout_height="wrap_content"
        android:onClick="onClick"
        android:layout_gravity="bottom"
        android:text="Start new Activity" />
 </LinearLayout> 
Ensure that the selection of the spinner is saved and restored between configuration changes or restarts of the activity by the Android system.